How to Edit Images in Midjourney with their Inpainting Tool - Vary (Region)
-(2)-profile_picture.jpg)
Written by Ivana Kotorchevikj We Tested
Key Takeaways
To edit your image with the Midjourney inpainting feature:
- Generate an image in Midjourney.
- Upscale an image by clicking on one of the ‘U’ buttons.
- Click on the ‘Vary (Region)’ button.
- Select the rectangular and a lasso selecting icon.
- Modify the part of the prompt representing the object in the image.
- Finally, click on the ‘Submit job’ button.
There has been a bundle of Midjourney updates in the past couple of months related to options allowing users to edit and extend the generated image. The latest update has been long expected, and the Midjourney community is excited about it. We’re talking about the inpainting feature called Vary (Region).
In this article, we’ll explore how the Vary (Region) feature works and how you can use it to edit your images with Midjourney.
What is the inpainting feature Vary (Region) in Midjourney?
Midjourney released the new inpainting feature on August 22, announcing it on their Discord server.
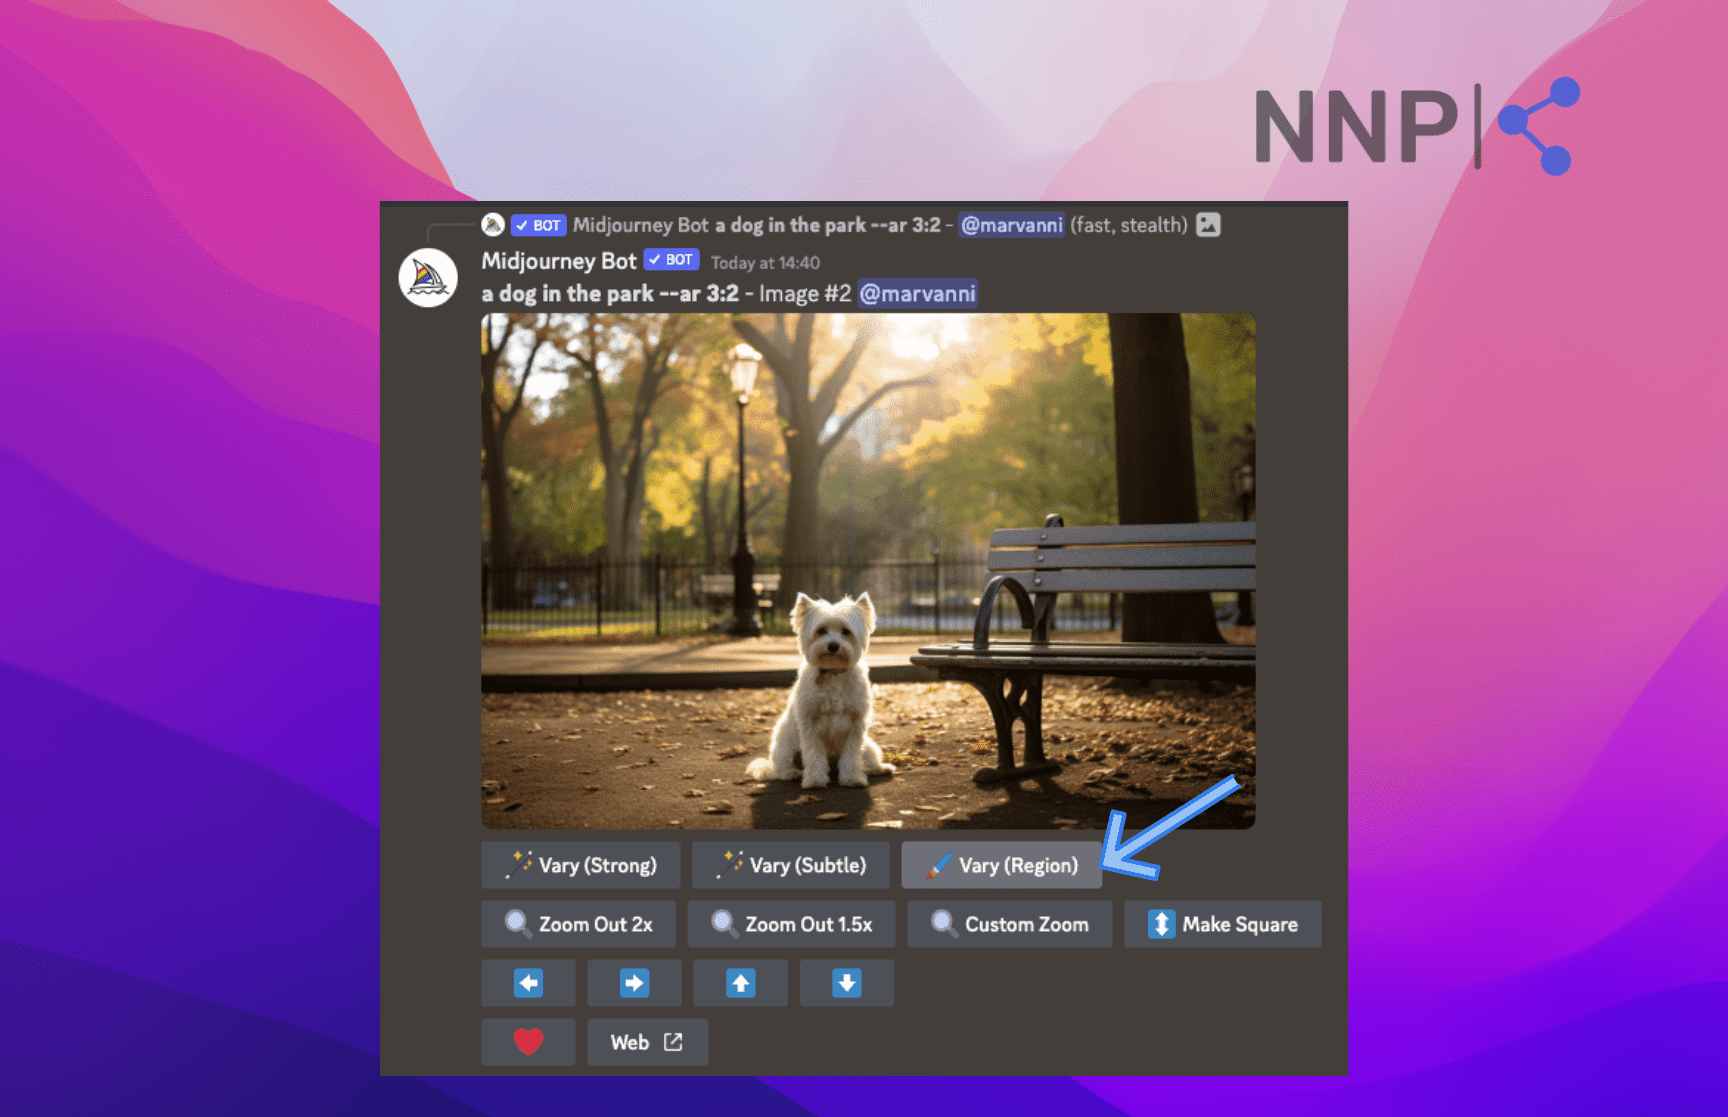
It appears as a Vary (Region) button next to Vary (Subtle) and Vary (Strong) after an image has been upscaled. The inpainting tool allows you to select and regenerate a particular area in the image.
This is extremely useful when you only want to replace an object with another one in an image, but don’t want to generate a new image, since it won’t turn out exactly like the previous one.
If you don’t see the option, close and reopen the app to update your Discord client. The inpainting feature is available in Midjourney Model Versions V5.0, V5.1, V5.2, and niji 5.
Other Midjourney users and Midjourney itself recommend using the /remix mode (which you can activate with /settings) to activate a text box in the Vary (Region) feature that allows you to modify the prompt and get the best results.
Also, Midjourney provides several tips and tricks in their Discord announcement about using the inpainting feature:
- Use the feature to edit bigger regions of the image, like 20% to 50% of the image.
- Although it’s quite impressive, it’s still no magic. If you like to make more drastic changes, Midjourney suggests using the Vary (Subtle) feature.
- If you are changing the prompt, keep in mind to be still closely related to the image in question. For example, try adding a hat or changing the hat with a crown to the character instead of typing in a completely unrelated prompt, for example, “a dog driving.”
- You can use the 'prompt remixing' feature for all sorts of touch-ups, but Mijdourney gives a heads up it might sometimes give you a hard time and not do exactly what you're trying to get it to do.
Check out how to use Midjourney seeds to get consistent images using the same prompt.
How to use the Midjourney inpainting feature
Having the above tips in mind, we can now explore how to use the feature to edit your images generated in Midjourney.
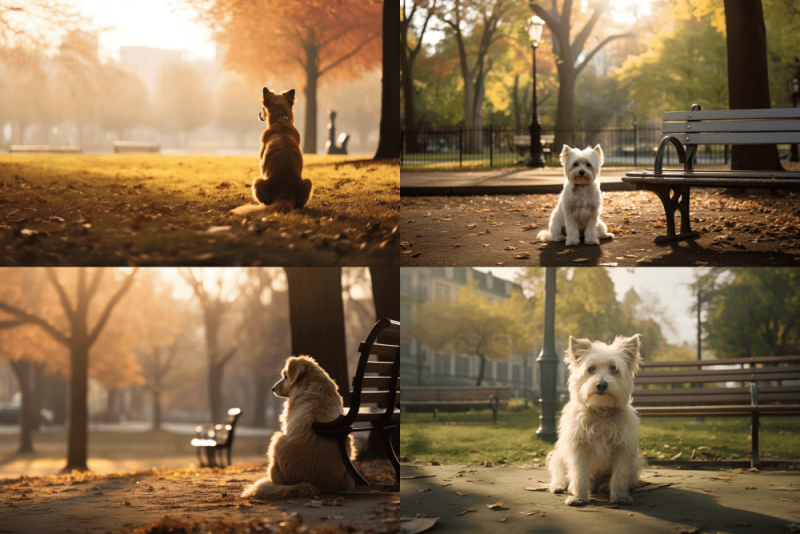
- Generate an image in Midjourney with the ‘/imagine’ command.
- Upscale an image by clicking on one of the ‘U’ buttons.
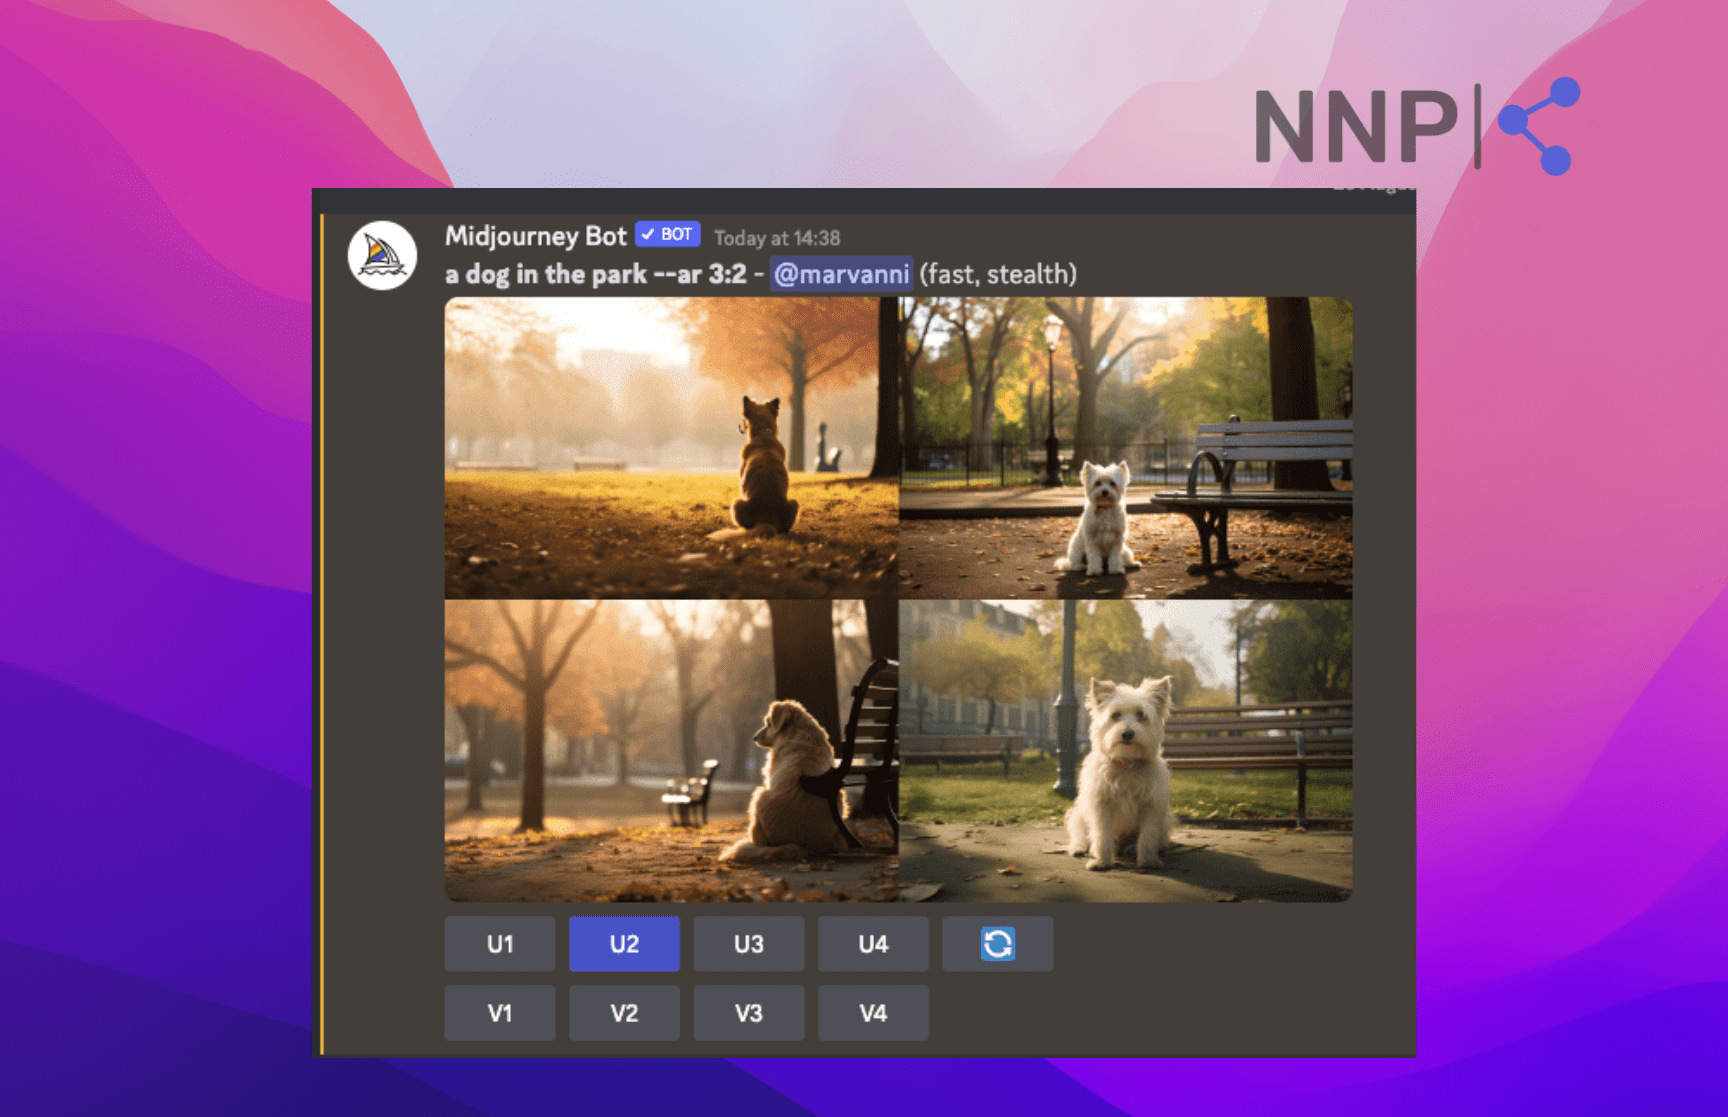
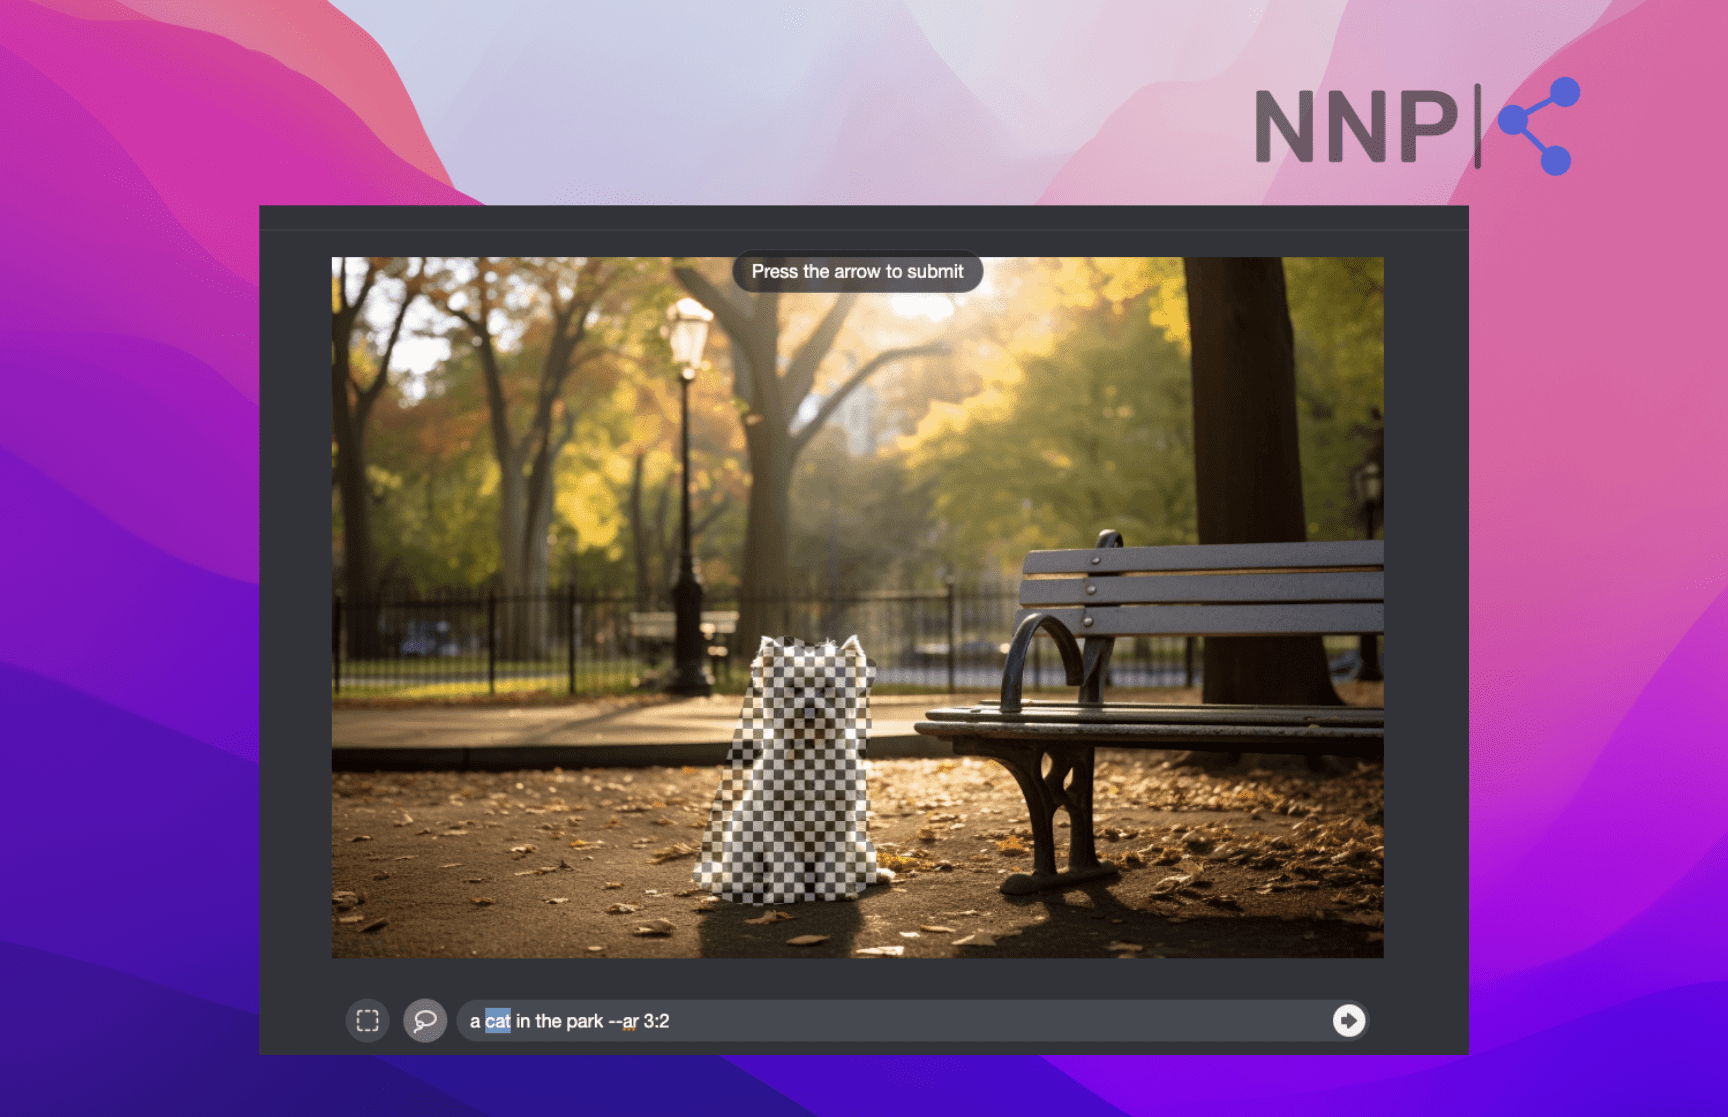
- Click on the ‘Vary (Region)’ button below the image next to the other editing options. This will open a new edit window.
- In the bottom-left corner, you’ll see two selecting options - a rectangular and a lasso. Use the rectangular option to inpaint a larger area with a more regular shape, and the lasso option for a more subtle or irregular-shaped area. But you can try both the selecting options to see which one works best for you. Whichever option you use, make sure you correctly select the area you want to modify to get the best results. Note
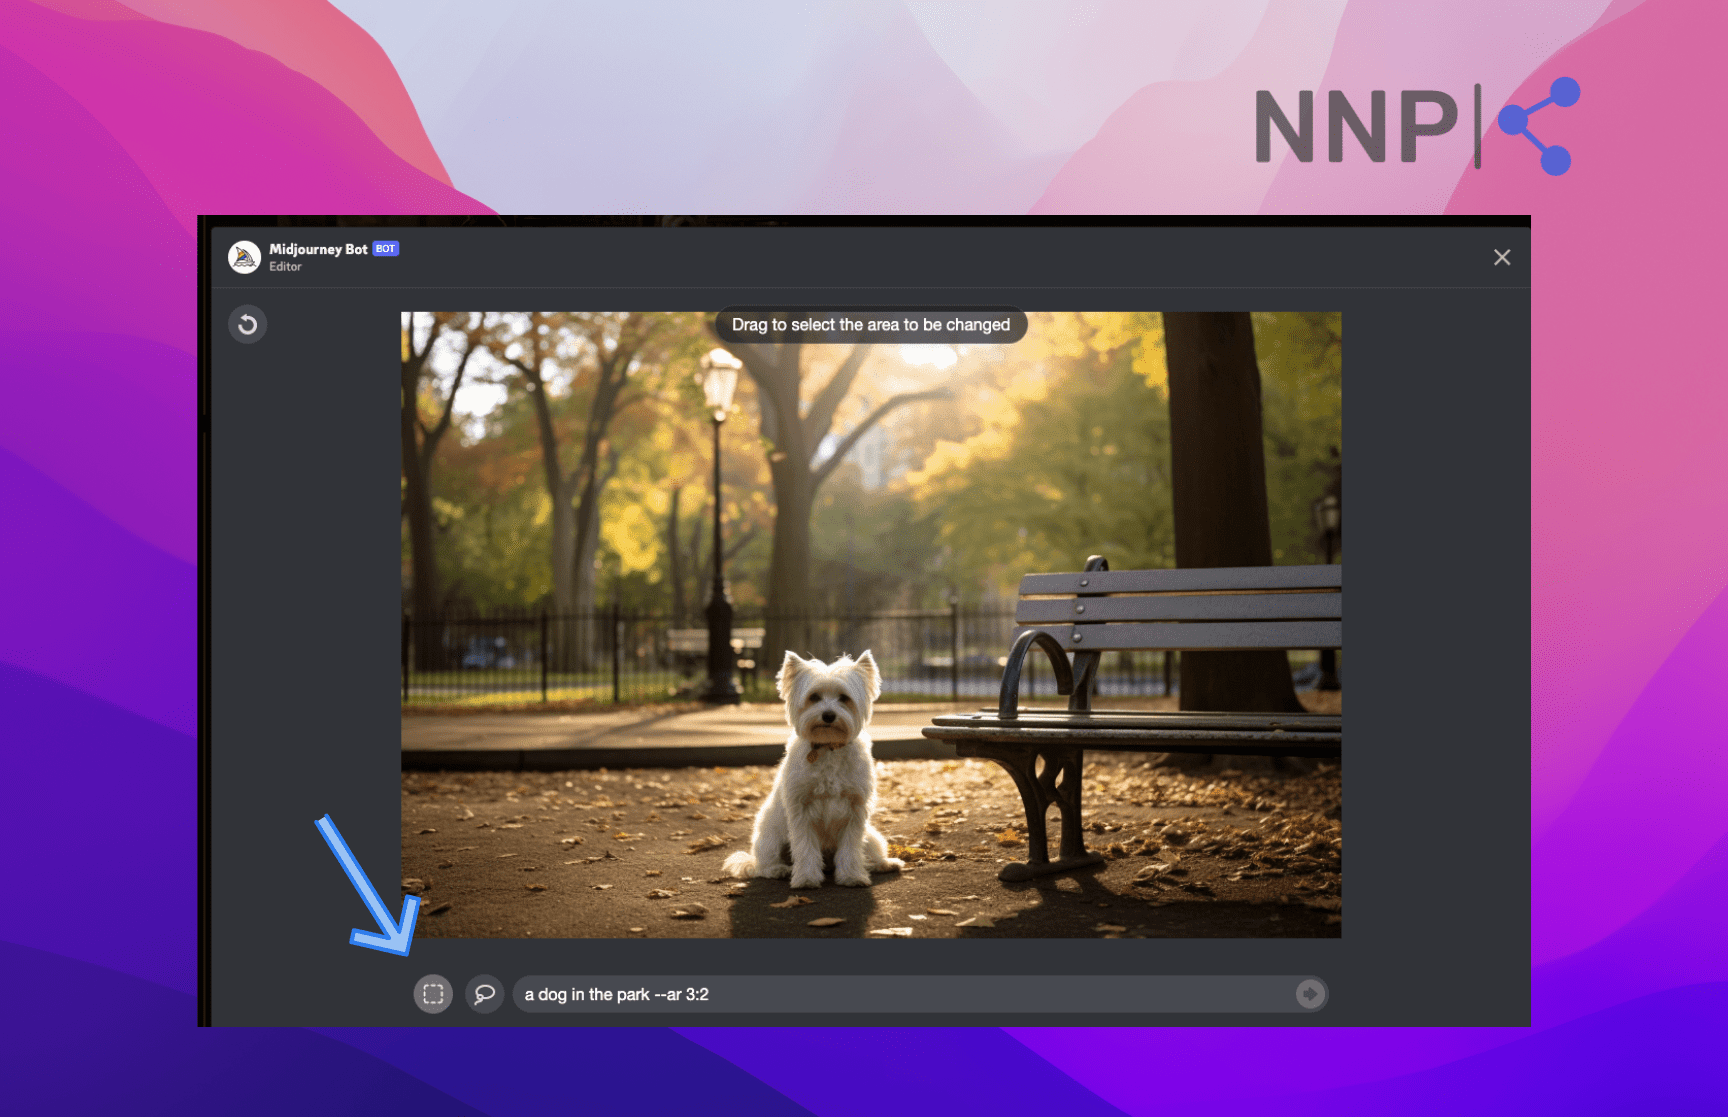
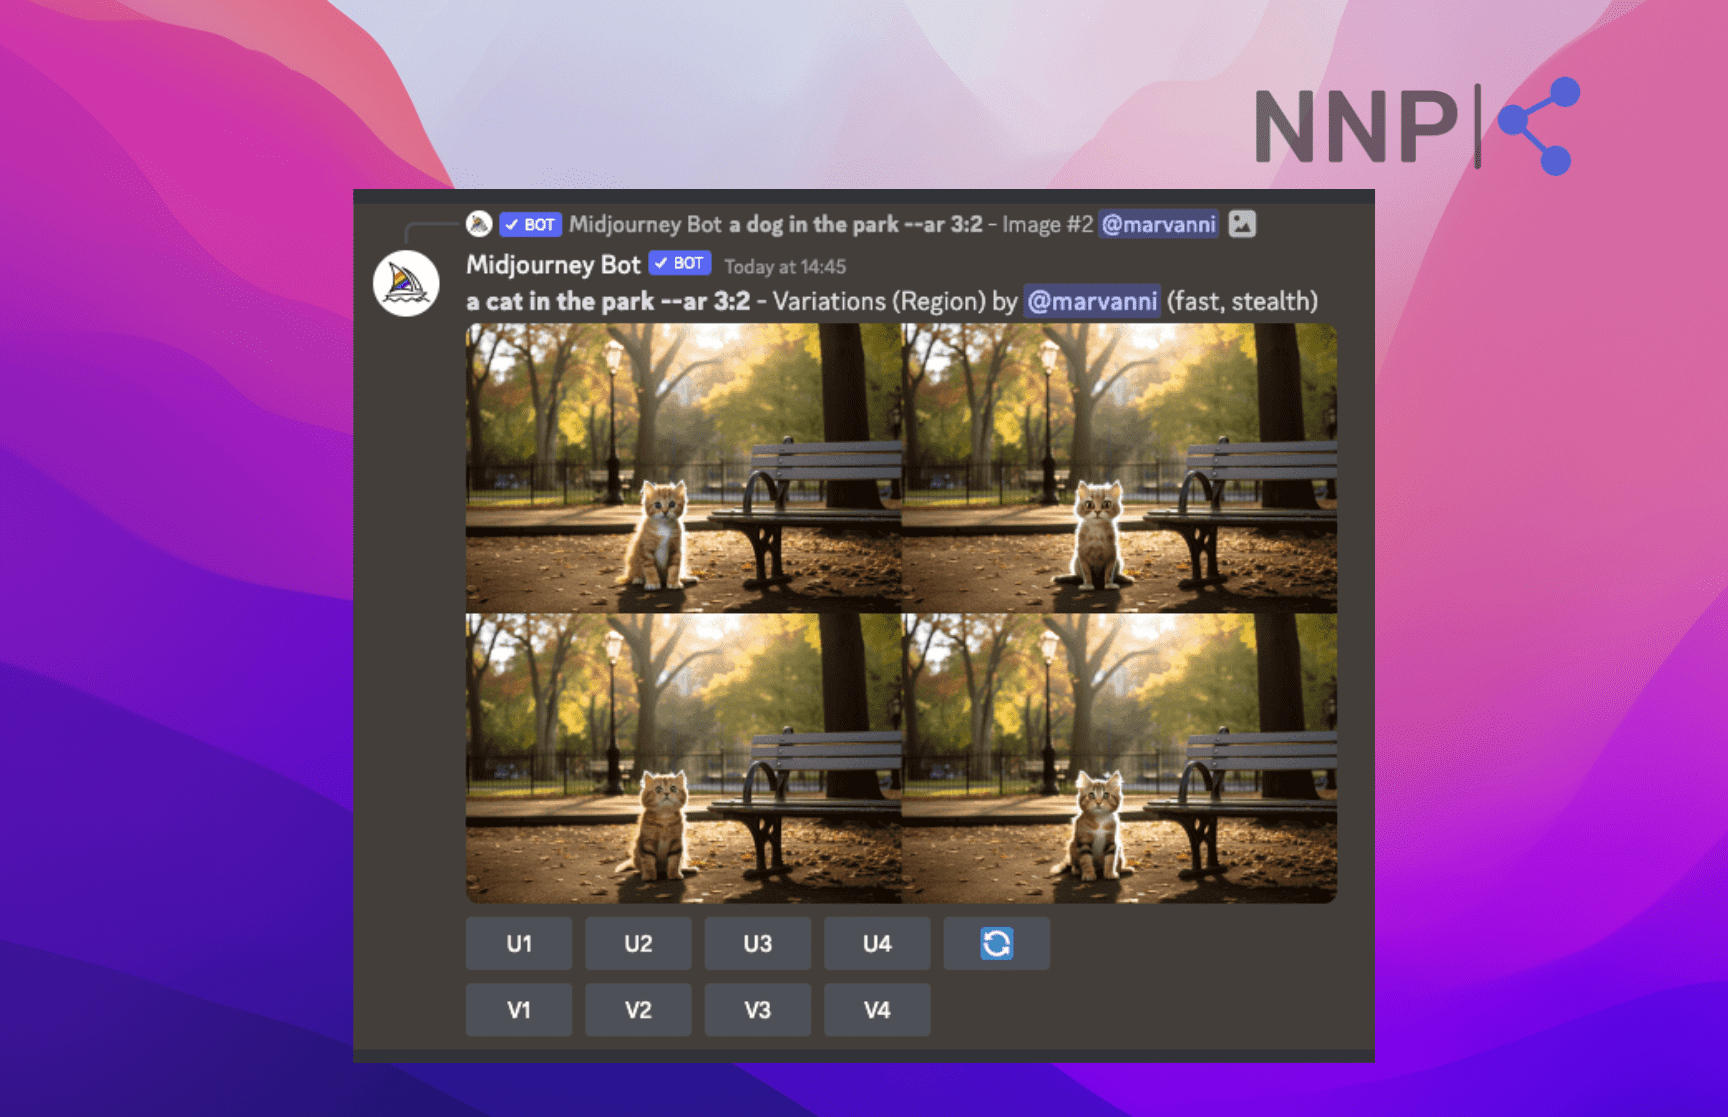
- Next, in the text box at the bottom, modify the part of the prompt representing object in the image. For example, if the original prompt was ‘a dog in the park,’ and we want to have an image with a cat instead, we change it into ‘a cat in the park.’
- Alternatively, after selecting the portion or object of the image you want to modify, in the text box enter the object you want to show in the image instead of the existing one, instead of only replacing it in the whole prompt.
- Finally, click on the ‘Submit job’ button at the bottom-right corner of the window.
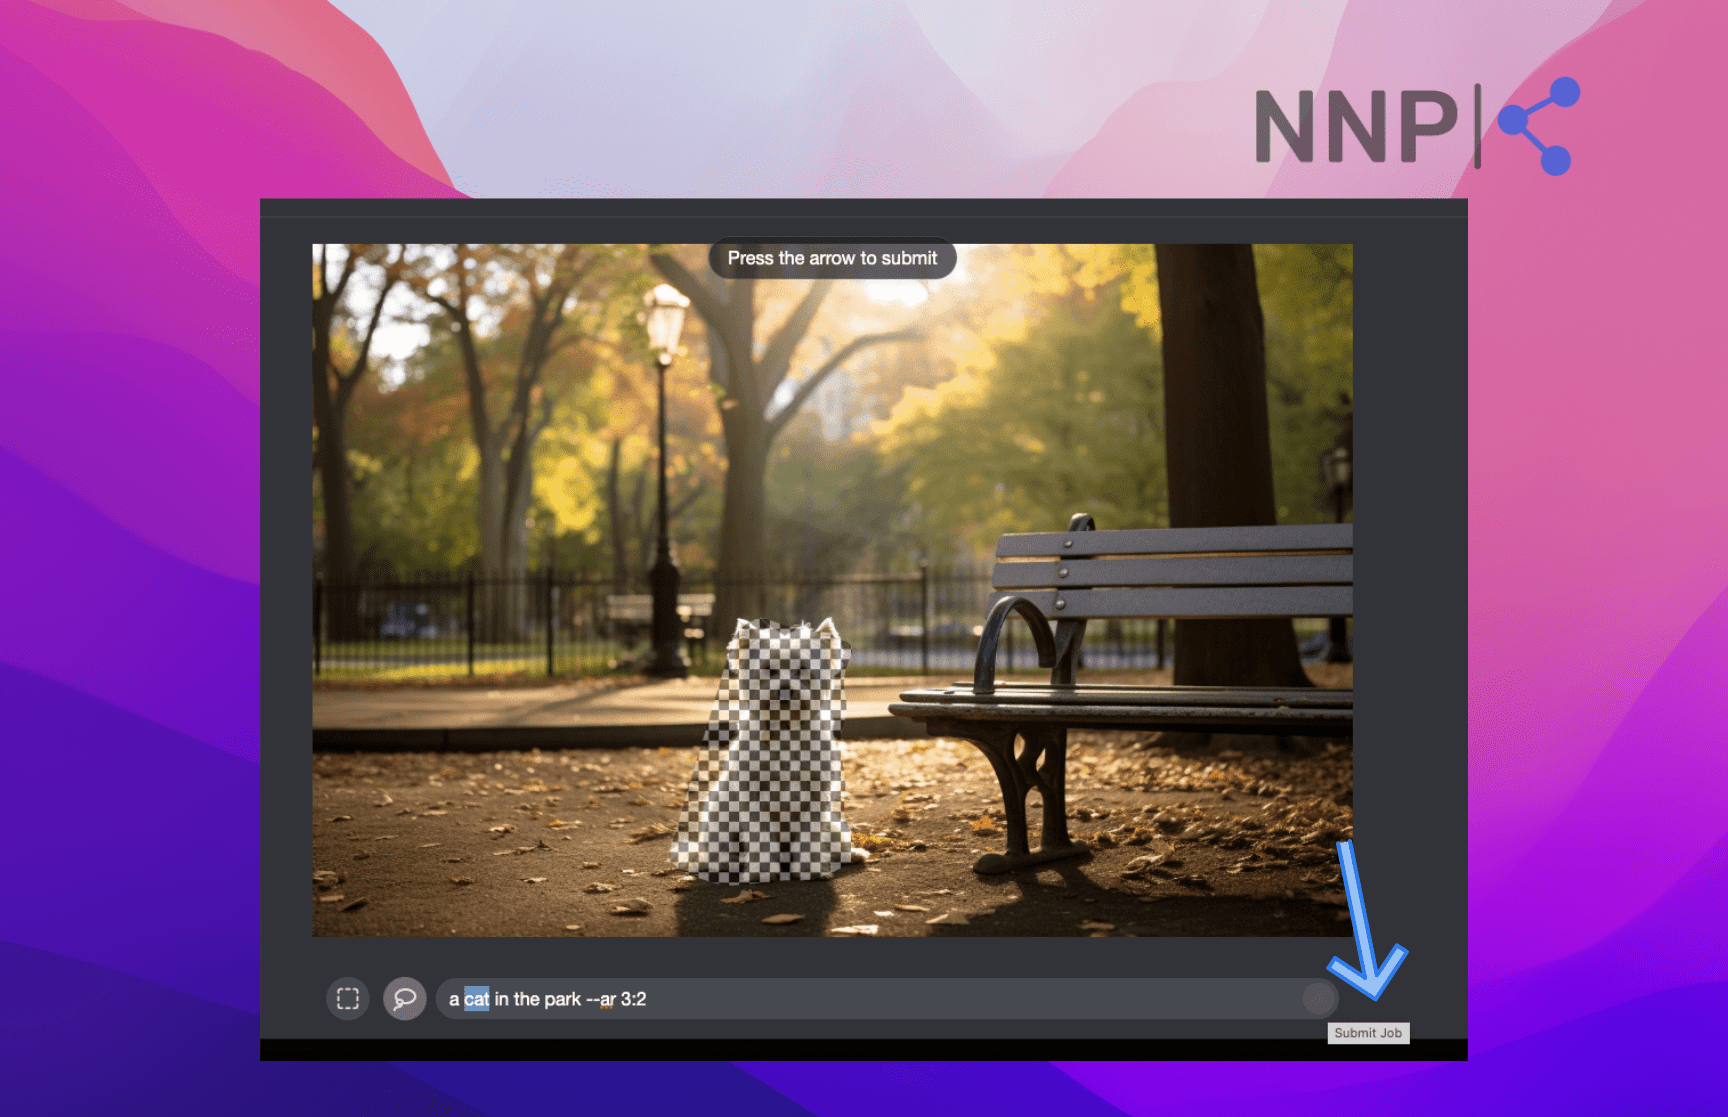
If you don’t like the results, click on the ‘Undo’ option in the top-left corner to reverse the image to its original.
🌈 If you want to learn more about Midjourney, check out how to create logos with Midjourney.
Enhancing creativity with Midjourney's Vary (Region) feature
The recently introduced Vary (Region) feature in Midjourney provides an exciting and innovative tool for users to selectively edit images.
This inpainting tool offers flexibility in replacing specific parts of an image without regenerating the whole. Users can explore various ways to modify their generated images using both rectangular and lasso selecting options, combined with prompt remixing. Although impressive in its capabilities, the tool may still require careful application to achieve desired results.
The update represents a significant enhancement in Midjourney's offerings, enabling more nuanced image manipulations and extending the platform's appeal to a broader audience.